🧰 This post kicks off a new series on Git essentials—starting with .gitignore, a simple yet powerful tool for managing what gets tracked in your repositories.
🗃️ What is .gitignore?
When working with Git, it’s common to have files that shouldn’t be tracked—such as build artifacts, temporary files, or sensitive information. The .gitignore file allows you to specify patterns for files and directories that Git should ignore.
By placing a .gitignore file in your repository’s root directory, you instruct Git to disregard specified files, keeping your version history clean and focused.
📝 Creating a .gitignore File
To create a .gitignore file:
- Navigate to your repository’s root directory.
-
Create the
.gitignorefile:touch .gitignore - Open the file in your preferred text editor and add patterns for files/directories to ignore.
Example:
# Ignore node_modules directory
node_modules/

# Ignore all .log files
*.log

# Ignore build output
dist/
🔄 Applying .gitignore to Already Tracked Files
If you’ve already committed files that should be ignored, updating .gitignore won’t remove them from the repository. To stop tracking these files:
-
Remove the files from the index:
git rm --cached filename -
Commit the changes:
git commit -m "Remove ignored files from tracking" -
Push the changes to your remote repository.
🌐 Global .gitignore
For patterns that should apply to all your Git repositories (e.g., OS-specific files like .DS_Store), you can set up a global .gitignore:
-
Create a global
.gitignorefile:touch ~/.gitignore_global -
Configure Git to use this file:
git config --global core.excludesFile ~/.gitignore_global
Then add your global ignore patterns to ~/.gitignore_global.
🧪 Tips and Best Practices
- Use comments: Prefix lines with
#to explain ignore rules. - Be specific: Avoid overly broad patterns that may unintentionally ignore important files.
- Leverage templates: Use GitHub’s official
.gitignoretemplates for popular languages, editors, and frameworks.
By effectively using .gitignore, you maintain a clean and efficient repository, free from unnecessary files and potential security risks.
Stay tuned for the next post in this series, where we’ll explore branching strategies and how to manage them effectively.
]]>🎉 It’s live here: Terraforming My Career
📘 What You’ll Find
The new site currently includes:
- 🛠 Terraform: from getting started to change management and teardown
- 📚 Learning Plans: a structured timeline to guide my Cloud & DevOps path
- 🐳 Sections for Docker, Kubernetes, and AWS (in progress)
- 📖 Reading Notes from books like Terraform: Up & Running
Everything is structured in folders, rendered with Just the Docs, and completely searchable.
🔍 Why I’m Doing This
I believe in learning in public. Publishing my notes helps me:
- Stay accountable to my learning goals
- Give back to others walking a similar path
- Build writing discipline and clarity of thought
Over time, this space will grow into a personal knowledge base and lab journal — and you’re welcome to follow along.
💡 Want to build something similar? Check out the GitHub repo, fork it, and feel free to reach out.
]]>In the Windows ecosystem, tools like Remote Desktop Manager help handle and manage multiple connections to the various servers within the infrastructure. But how can we achieve something similar for SSH connections to frequently accessed servers in Linux?
Let’s explore how this can be done efficiently in the command line.
SSH Config file
First, if it doesn’t already exist, create the .ssh directory in a convenient location (I keep mine in my $HOME directory):
mkdir .ssh
Next, create a file named config, adjust its default permissions, and open it with your favorite text editor:
touch config

chmod 600 config

vim config
This file is automatically sourced by the terminal, allowing you to easily connect to machines defined in it. Here’s a sample of the configuration I use to manage my servers:
Host node_01
        Hostname node01.lab.com
        User pscustomobject
        IdentityFile /home/pscustomobject/.ssh/id_rsa
Host node_02
        Hostname node02.example.com
        User adminuser
        Port 4242

## Set connection defaults for all hosts, this is overriden by host options
Host *
     ForwardAgent no
     ForwardX11 no
     ForwardX11Trusted yes
     User pscustomobject
     Port 22
     Protocol 2
     ServerAliveInterval 60
     ServerAliveCountMax 30
Key Notes
- The IdentityFile directive points to the location of your private key. This can be stored in a shared or networked location for easier access across multiple devices.
- The *Host ** section defines defaults for all hosts, which individual host entries can override.
Once the SSH configuration is in place, you can connect to any of the defined hosts simply by issuing the command:
ssh node_01
Better yet, tab completion will work just as it does for standard commands, so you don’t have to remember the exact name of each node.
Additional Tips
I highly recommend reading the ssh_config man page (man ssh_config) to discover the numerous other options you can use in your config file to further streamline and simplify SSH connection management.
]]>When managing Active Directory (AD) environments, creating unique User Principal Names (UPNs) is a common, and challenging!, task.
This blog post covers two PowerShell functions that help ensure UPN uniqueness: Test-UPNExist and Get-UniqueUPN. These functions can be particularly useful for automating user creation processes and can be integrated into your automation projects and solutions.
Note Both cmdlets are still under active development so do expect some changes, as I progres with development I will update the post. Feel free to report any issue, idea or suggestion so that I can integrate it into the final cmdlet version.
Function 1: Test-UPNExist
This is a support that is used to check if given UPN already exists in the AD environment.
function Test-UPNExist
{
<#
    .SYNOPSIS
        Cmdlet will check if a given UPN exists in the forest.

    .DESCRIPTION
        Cmdlet is a diagnostic tool to check if a given UPN is already assigned to a user in the forest.

    .PARAMETER UPN
        A string representing the UPN to check for uniqueness.

    .PARAMETER AdServer
        A string representing the name of the domain controller to be used for the check, if parameter
        is not specified the closest Global Catalog is used.

    .EXAMPLE
        PS C:\> Test-UPNExist -UPN '[email protected]'
#>

    [CmdletBinding()]
    param
    (
        [Parameter(Mandatory = $true)]
        [ValidateNotNullOrEmpty()]
        [string]$UPN,
        [ValidateNotNullOrEmpty()]
        [string]$AdServer
    )

    if ([string]::IsNullOrEmpty($AdServer) -eq $true)
    {
        $adForest = [System.DirectoryServices.ActiveDirectory.Forest]::GetCurrentForest()
        [string]$ldapPath = '{0}{1}' -f 'GC://', $($adForest.FindGlobalCatalog().Name)
    }
    else
    {
        [string]$ldapPath = '{0}{1}' -f 'LDAP://', $AdServer
    }

    # Instantiate required objects and run query
    $adDomain = New-Object System.DirectoryServices.DirectoryEntry($ldapPath)
    $adSearcher = New-Object System.DirectoryServices.DirectorySearcher($adDomain)
    $adSearcher.SearchScope = 'Subtree'
    $adSearcher.PageSize = 1000
    $adSearcher.Filter = "(&(objectCategory=person)(userPrincipalName=$UPN))"
    [void]($adSearcher.PropertiesToLoad.Add("userPrincipalName"))

    [array]$searchResult = $adSearcher.FindOne()

    return $null -ne $searchResult
}
Here’s a summary explanation of the parameters:
- Parameters
- $UPN - A string representing the UPN to check
- $Server - A string representing the name of the LDAP server to query. Parameter is optional and if omitted function will automatically select the closest global catalog server
Here’s an example usage:
$upnExists = Test-UPNExist -UPN "[email protected]"

if ($upnExists -eq $true) # Redundant I know but I like to make code redeable :-)
{
    Write-Host "The UPN exists."
}
else
{
    Write-Host "The UPN does not exist."
}
Function 1: Test-UPNExist
This function generates a unique UPN based on given name components and ensures it doesn’t already exist in the AD forest.
function Get-UniqueUPN
{
<#
    .SYNOPSIS
        Cmdlet will generate a forest wide unique UPN.

    .DESCRIPTION
        Cmdlet will generate a forest wide unique UPN according to generation rules
        defined by the user.

        Cmdlet accept different types of objects to generate the UPN to allow greater flexibility

        ADObject - For example and object from Get-AdUser cmdlet
        Strings - Representing First Name, Last Name etc.
        DirectoryService Objects - For example when using native .Net methods to retrieve the identity

    .PARAMETER ADObject
        An ADObject for example output of the Get-ADUser cmdlet

    .PARAMETER FirstName
        A string representing the First Name of the user

    .PARAMETER LastName
        A string representing the Last Name of the user

    .PARAMETER MiddleName
        A string representing the Middle Name of the user, parameter is optional.

    .PARAMETER UPNSuffix
        A string representing the UPN suffix to be used.

    .PARAMETER FirstNameFormat
        A string representing the format to be for the First Name part of the UPN.

    .PARAMETER LastNameFormat
        A string representing the format to be for the Last Name part of the UPN.

    .PARAMETER IncludeMiddleName
        When paramenter is specified user Middle Name, if present, will be included in the UPN generation process.

    .PARAMETER ADServer
        A string representing the name of the AD Domain Controller that will be used to query Active Directory.

        If no server is specified the closest Global Catalog will be automatically selected.

    .PARAMETER Separator
        A string representing the separator to be used between UPN parts, defaults to a '.'.
#>

    [CmdletBinding(DefaultParameterSetName = 'Strings')]
    param
    (
        [Parameter(ParameterSetName = 'ADObject',
                   Mandatory = $true)]
        [object]$ADObject,
        [Parameter(ParameterSetName = 'Strings',
                   Mandatory = $true)]
        [ValidateNotNullOrEmpty()]
        [string]$FirstName,
        [Parameter(ParameterSetName = 'Strings',
                   Mandatory = $true)]
        [ValidateNotNullOrEmpty()]
        [string]$LastName,
        [Parameter(ParameterSetName = 'Strings')]
        [ValidateNotNullOrEmpty()]
        [string]$MiddleName,
        [Parameter(Mandatory = $true)]
        [ValidateNotNullOrEmpty()]
        [string]$UPNSuffix,
        [ValidateSet('FullName', 'FirstLetter', IgnoreCase = $true)]
        [ValidateNotNullOrEmpty()]
        [string]$FirstNameFormat = 'Full',
        [ValidateSet('FullName', 'FirstLetter', IgnoreCase = $true)]
        [ValidateNotNullOrEmpty()]
        [string]$LastNameFormat = 'FullName',
        [switch]$IncludeMiddleName,
        [ValidateNotNullOrEmpty()]
        [string]$ADServer,
        [ValidateNotNullOrEmpty()]
        [string]$Separator = '.'
    )

    if ($PSCmdlet.ParameterSetName -eq 'ADObject')
    {
        switch ($ADObject.GetType().FullName)
        {
            'Microsoft.ActiveDirectory.Management.ADUser'
            {
                [string]$firstName = $ADObject.GivenName
                [string]$lastName = $ADObject.Surname
                [string]$middleName = $ADObject.MiddleName

                break
            }
            'System.DirectoryServices.DirectoryEntry'
            {
                [string]$firstName = $ADObject.Properties['givenName'][0]
                [string]$lastName = $ADObject.Properties['sn'][0]
                [string]$middleName = $ADObject.Properties['middleName'][0]

                break
            }
            'System.DirectoryServices.SearchResult'
            {
                [string]$firstName = $ADObject.Properties['givenName'][0]
                [string]$lastName = $ADObject.Properties['sn'][0]
                [string]$middleName = $ADObject.Properties['middleName'][0]

                break
            }
            default
            {
                throw "Unsupported AD object type: $($ADObject.GetType().FullName)"
            }
        }
    }
    else
    {
        [string]$firstName = $FirstName
        [string]$lastName = $LastName
        [string]$middleName = $MiddleName
    }

    # Format first name
    $firstName = switch ($FirstNameFormat)
    {
        'FullName'
        {
            $firstName
        }
        'FirstLetter'
        {
            $firstName.Substring(0, 1)
        }
    }

    # Format last name
    $LastName = switch ($FirstNameFormat)
    {
        'FullName'
        {
            $LastName
        }
        'FirstLetter'
        {
            $LastName.Substring(0, 1)
        }
    }

    # Use middle name
    [string]$middleNamePart = if ($IncludeMiddleName -and $MiddleName)
    {
        '{0}{1}' -f $Separator, $MiddleName
    }

    # Setup required attributes
    [string]$baseUPN = ('{0}{1}{2}{3}@{4}' -f $FirstName, $middleNamePart, $Separator, $LastName, $UPNSuffix).ToLower()
    [string]$uniqueUPN = $baseUPN
    [int]$counter = 1

    while (Test-UPNExist -UPN $uniqueUPN -Server $ADServer)
    {
        $uniqueUPN = '{0}{1}@{2}' -f ($baseUPN.Split('@')[0]), $counter, $UPNSuffix

        $counter++
    }

    return $uniqueUPN
}
Here’s a summary explanation of the parameters:
- Parameters
- $ADObject - We can pass an existing AD object to the function, for example output from the Get-AdUser cmdlet
- $FirstName - A string representing the First Name of a given user
- $LastName - A string representing the Last Name of a given user
- MiddleName - A string representing the Middle Name of a given user (of course optional)
- $UPNSuffix - A string representing the domain suffix for the UPN
- FirstNameFormat - The format of the first name in the UPN (e.g. Full or First letter of name)
- IncludeMiddleName - Switch parameter indicating to cmdlet if Middle Name should be used or not in the UPN generation
- $Server - A string representing the name of the LDAP server to query. Parameter is optional and if omitted function will automatically select the closest global catalog server
- $Separator - The separator to use between the name parts. If not specified a ‘.’ (dot) is used
Below you can find couple examples of functions at work
# Using string parameters
$uniqueUPN = Get-UniqueUPN -FirstName "John" -LastName "Doe" -UPNSuffix "example.com" -FirstNameFormat "FirstLetter" -IncludeMiddleName -MiddleName "A"

Write-Host "Generated UPN: $uniqueUPN"

# Using an AD object
$adUser = Get-ADUser -Identity "johndoe"
$uniqueUPN = Get-UniqueUPN -ADObject $adUser -UPNSuffix "example.com"

Write-Host "Generated UPN: $uniqueUPN"
Conclusion
By using Test-UPNExist and Get-UniqueUPN, you can automate the process of generating unique UPNs for users in your Active Directory environment.
These functions ensure that each UPN is unique and adhere to the naming conventions you specify.
This approach minimizes the risk of conflicts and simplifies user management.
As mentioned both functions are still under development and I need to cleanup code and optimize some parts of it but the core functionality is there.
As usual all the code is available on my GitHub repository.
I would love to receive feedback, ideas or implemntation ideas for them!
]]>PowerShell natively supports getting the current, or specific, date via the following cmdlet:
Get-Date
Which, by default, will produce the following output:
Monday, February 21, 2022 10:11:39 PM
Cmdlet supports methods which can be used to display/return the day of the week for the selected date
(Get-Date).DayOfWeek
There are situations where rather than returning a string with the day name it can be useful to return the number (1 to 7) associated with the day’s name, this can easily be accomplished with the following command
(Get-Date).DayOfWeek.value__

# Output
1
This is specially handy when inserting data into SQL datbase supporting dates as TinyInt data types.
]]>As I have written in my previous post about TokenExpiry error message Microsoft is retiring ability to connect to Exchange Online via basic authentication.
You can read my article on how to implement Certificate Based authentication for Exchange Online here.
Could not use the certificate for signing error message
Today while I was updating code for one of our automations I created a request for a new certificate to use for authentication purposes.
Once I deployed code to our test environment automation was failing the connection to Exchange Online with the following error
[System.Management.Automation.RuntimeException] One or more errors occurred.
[Microsoft.Identity.Client.MsalClientException] Could not use the certificate for signing. See inner exception for details. Possible cause: this may be a known issue with apps build against .NET Desktop 4.6 or lower. Either target a higher version of .NET desktop - 4.6.1 and above, or use a different certificate type (non-CNG) or sign your own assertion as described at aka.ms/msal-net-signed-assertion.
[System.Security.Cryptography.CryptographicException] Invalid provider type specified.
Funnily enough the same certificate and cmdlets were working fine with PowerShell 7.
After quite some troubleshooting I’ve found out the problem was caused by the certificate’s private key using Cryptography Next Generate (CNG) template rather than RSA.
Not having direct access to the CA releasing the certificate I could not change this so I had to resort on either running the automation in PowerShell 7 or update the certificate itself.
Luckily this is easily done via OpenSSL. Let’s see how.
Convert Certificate private key from CNG to RSA
If you have installed Git, cygwin or Windows Subsystem for Linux you just need to fire a bash prompt and use the following commands:
# Extract the public key from the cert
OpenSSL pkcs12 -in "CNGCertificate.pfx" -nokeys -out "temp.cer"

# Extract the private key
OpenSSL pkcs12 -in "CNGCertificate.pfx" -nocerts -out "temp.pem"

# Convert key to RSA
OpenSSL rsa -inform PEM -in "temp.pem" -out "temp.rsa"

# Finally create a new pfx file
OpenSSL pkcs12 -export -in "temp.cer" -inkey "temp.rsa" -out "RSACertificate.pfx"
Note: In the above commands I am not using a password for the certificate as everything is local to my machine but a password is definitely required when exporting a certificate together with the private key.
Once the new pfx file has been created all temporary certificates can be safely removed form the system and connection to Exchange Online will go through just fine.
Again if you can use PowerShell 7 you will not face this issue but in case you’re stuck with version 5.1 and facing this error message hopefully this post can save you some headaches.
Full credit for the solution goes to this StackOverFlow thread
]]>Microsoft is, finally, disabling basic authentication (read username and password) in Exchange Online in favor of Certificate Based authentication.
Once this change is fully implemented, around mid February at least for some tenants, connecting via username and passwords to Exchange Online will not be possible anymore.
You can read my article on how to implement Certificate Based authentication for Exchange Online here.
As a result of this change I started updating one of our automations, responsible for the whole life-cycle of our mailboxes, to ditch old credential objects in favor of the more secure Certificate Authentication.
This is when I encountered the cannot bind argument to parameter ‘token expiry time’ because it is null. error message.
Multiple PowerShell Exchange Sessions
When operating an hybrid environment it is pretty common to open, in the same window/session, a PowerShell connection to both Exchange on-prem and Exchange Online.
This is required as part of the configuration, usually creation of the mailbox, takes place in on-prem for example via the New-RemoteMailbox cmdlet while other parts of the configuration are performed directly online for example when delegating mailbox permissions.
While debugging my workflow I have noticed that, while trying to retreive mailbox information from the on-prem server, an exception was being thrown
# Cmdlet I was running
Get-RemoteMailbox -Identity $userUpn

# Part of the exception message
Cannot bind argument to parameter 'token expiry time' because it is null.
It took me a bit to figure this out as no exception was thrown during the connection phase either nor there was any other obvious pointer.
When I was about to give up and open a ticket with Microsoft, which is usually as helpful as freezer in the North Pole, I discovered that establishing a connection to Exchange Online followed by a connection to the on-prem server was yielding the desired result. In my workflow I had this the other way around, first local Exchange and then Online service, which was causing the issue.
Note: I have experienced/tested this with version 2.0.4 and 2.0.5 of Exchange Online PowerShell module but other versions could be affected as well.
I did not dig deep into the root cause of the issue but plan to do this tomorrow and already sent my feedback to exocmdletpreview {at} service {dot} microsoft {dot} com but I doubt I will hear anything from that channel. I will anyhow open a ticket with support to at least have an official statement/clarification on this.
As soon as I have any news I will update the post until then I hope you can find the information useful.
]]>If you follow my blog you probably know my GitHub where I share modules like the IT-ToolBox or handy standalone Functions that I developed to solve specific issues.
In my posts I often talked about PowerShell Gallery which you probably already used to install a module released by Microsoft or other developers.
Both are great tools when sharing code with a large audience over the internet, GitHub Private repositories are scope of this article, but a large chunk of my work involves developing modules that me and my colleagues user internally for automation purposes. These modules usually leverage technologies that are available only in my work environment and sometimes implement functions that would not have much sense outside my company.
One of the main issues we faced when initially started development of our own modules is ease of distribution to other team members for this reason we’ve setup internal NuGet repositories which can be used an internal PowerShell Gallery.
Required tools
Here’s what you will need to follow this article and setup your own PowerShell repository:
- A copy of Visual Studio the community edition will do just fine and it’s free
- The ASP.NET and web development workload installed here’s a guide on how to modify an existing Visual Studio installation in case you don’t have the appropriate workload installed already
- A server running a supported copy of Windows Server I am using Windows 2019 but 2016 will do just fine
Note: If you do not have or cannot install Visual Studio at the end of the post I have posted a link to my GitHub Repository
Create the Visual Studio Project
Once all requirements are in place open Visual Studio and create a project using the ASP.Web Application (Visual C#) template.
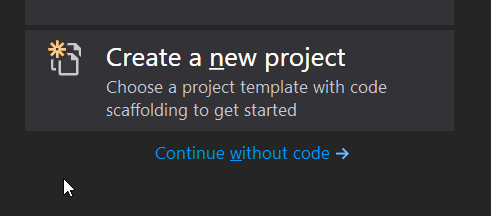
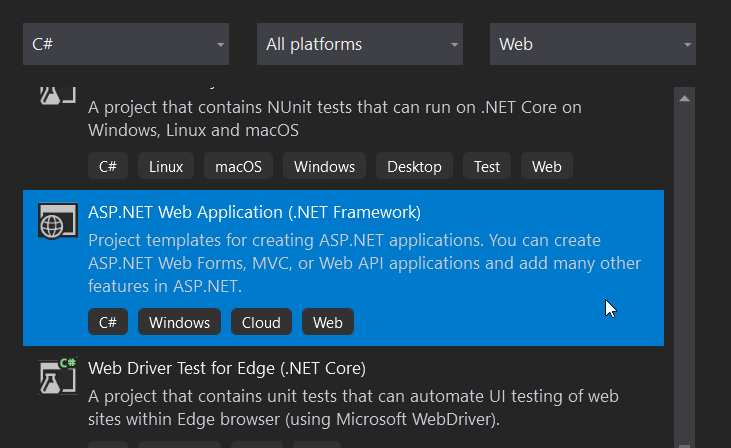
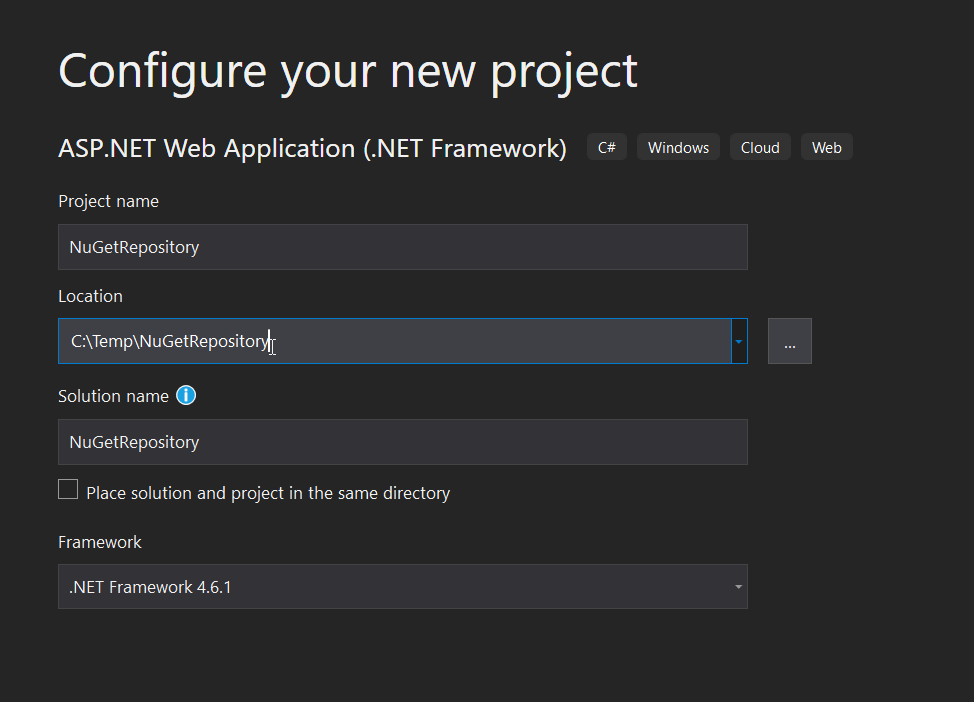
Application name is not important just avoid NuGet as this would create a conflict with one of the packages we need to install as part of the dependencies, in my example I’ve used NuGetRepository but it can really be anything
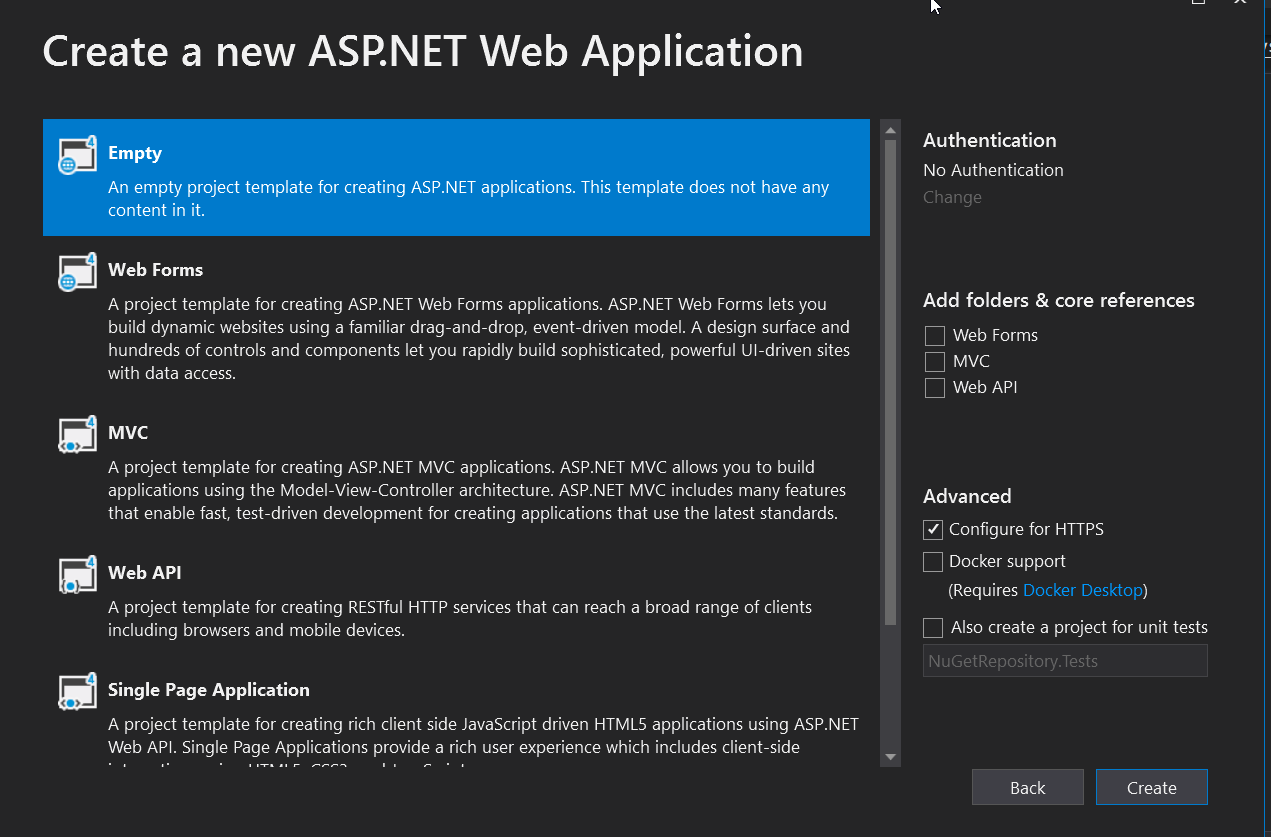
In the screen that will appear simply select the Empty template and then the Create button
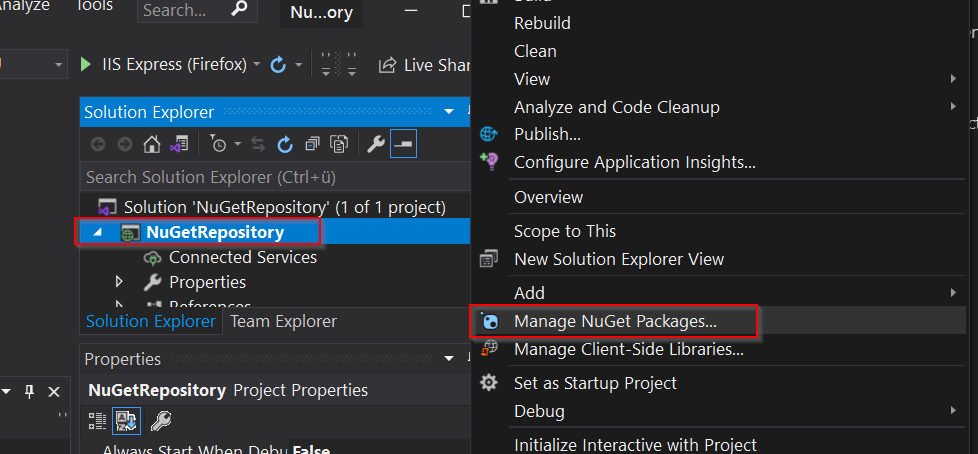
Once project has finished loading/being created right-click on the project name in solution explorer and select Manage NuGet Packages
In the NuGetRepository window select the Browse tab and search for package NuGet.Server and click on the Install button.

Keep I am using the latest stable release available at the time of this writing but you can select a different version of the package suiting your needs.
This step will take some time, depending on your connection speed, and a window showing you changes to the solution and asking your confirmation will appear in which case simply click on the Ok button.
Once the installation step is complete I highly recommend to change the build type from Debug, default for new projects, to Release as this will disable all debug logging that is otherwise enabled for the solution.

Once this is done go to Build / Build Solution menu, or press F6 if you’re lazy like me, to package together all files making up the solution.
This will create a folder structure, under the path previously specified, containing all files required by the solution. Project path is visible in the Properties window under the Project Folder field
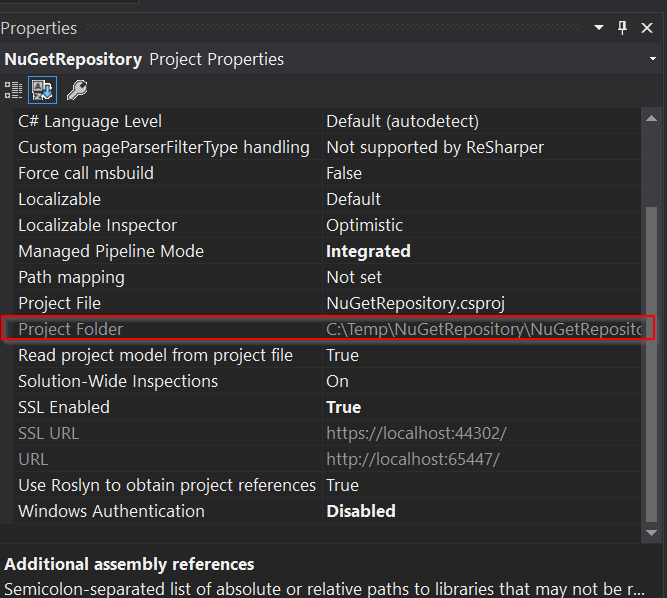
Note: By default solution will be build under the C:\Users\username\source\repos\AppName\AppName\ path
Install required Server Components
Once the solution has been build in Visual Studio move on the server that will be hosting the repository and launch the following cmdlet from an elevated PowerShell session to install required IIS components
# Splatted version
$paramInstallWindowsFeature = @{
    Name = 'Web-Server', 'Web-Net-Ext45', 'Web-Asp-Net45', 'Web-ISAPI-Filter', 'Web-ISAPI-Ext'
    IncludeManagementTools = $true
}

Install-WindowsFeature @paramInstallWindowsFeature

# Long unsplatted version
Install-WindowsFeature Web-Server,Web-Net-Ext45,Web-Asp-Net45,Web-ISAPI-Filter,Web-ISAPI-Ext -IncludeManagementTools
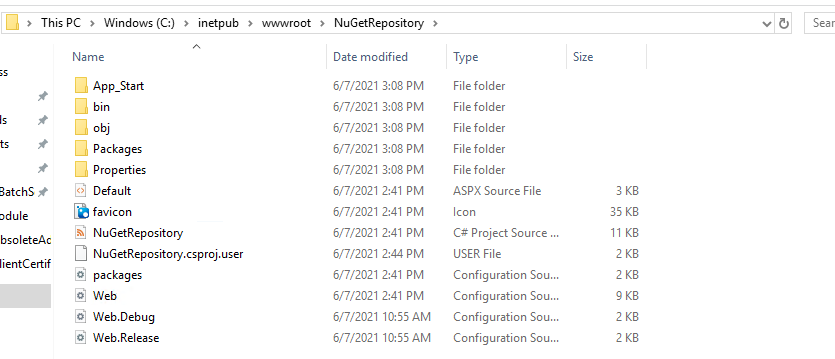
Once all components are in place copy the solution files to a directory on the server with the default being C:\inetpub\wwwroot. Path is not really import and could be anything you’d like, I will just stick with the default.
As a reference here’s how the content of my application folder looks like on my test server
Update Web.Config configuration file
The web.config file is located in the project root folder, assuming default path this will be C:\inetpub\wwwroot\NuGetRepository, open it with a text editor and under the <system.web> section you should see line similar the following (actual .Net Framework version could vary)
  <system.web>
    <compilation debug="true" targetFramework="4.6.1" />
    <!-- maxRequestLength is specified in Kb -->
    <httpRuntime targetFramework="4.6.1" maxRequestLength="30720" />
    <compilation debug="true" targetFramework="4.6" />
  </system.web>
Comment out or delete one of the instances of <compilation> tag so that resultant file will be similar the following
  <system.web>
    <compilation debug="true" targetFramework="4.6.1" />
    <!-- maxRequestLength is specified in Kb -->
    <httpRuntime targetFramework="4.6.1" maxRequestLength="30720" />
  </system.web>
Note: If the web.config file is not updated when opening the IIS Application an Internal Server Error message will be displayed an application won’t work.
Deploy Application to IIS
We can finally deploy the NuGet application to IIS to do so open **IIS Manager / Expand
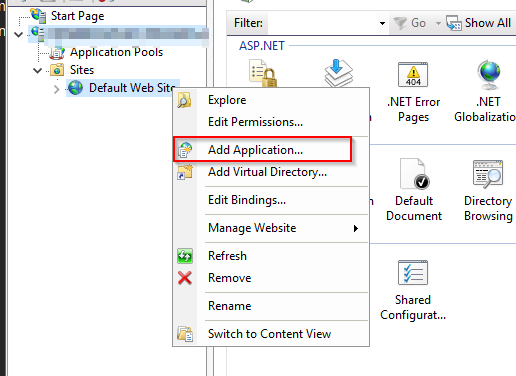
In the window that appears provide a name (alias) for the application and specify the path where application files reside
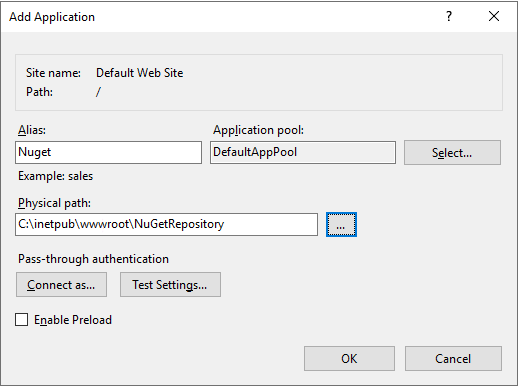
To test the configuration point your browser to http://localhost/Nuget which should yield the following page
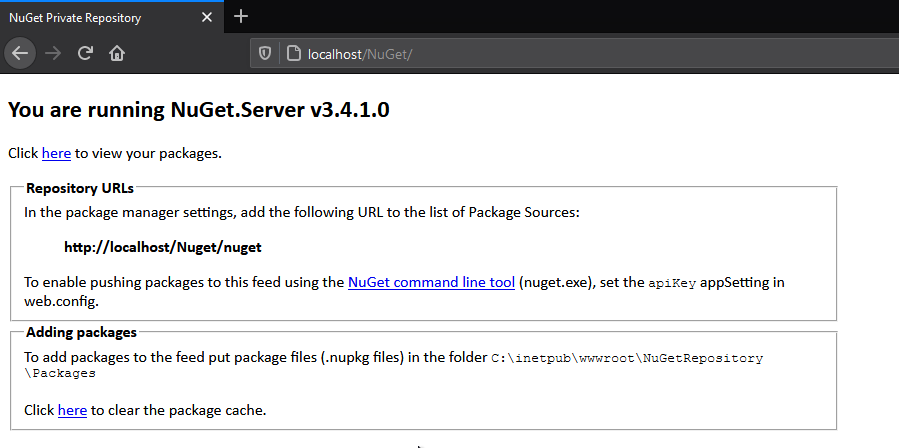
Configure Package Directory
In the default configuration packages are stored under the same path where the application lives in the Packages directory, in our example C:\inetpub\wwwroot\Nuget\Packages. This can be changed in the web.config configuration file via the following tag
    <!--
    Change the path to the packages folder. Default is ~/Packages.
    This can be a virtual or physical path.
    -->
    <add key="packagesPath" value="C:\SomePath\Packages" />
Configure Repository API Key
Up to this point the repository is ready and can be used to download packages from it but if we need to upload data, in our example PowerShell modules, to it we would need some form of authentication which in NuGet is accomplished through an API key.
First of all generate a unique API key, I generally use a GUID generated via New-Guid cmdlet, open the web.config file and update the apiKey value as in the following example
    <!--
    Determines if an Api Key is required to push\delete packages from the server.
    -->
    <add key="requireApiKey" value="true" />
    <!--
    Set the value here to allow people to push/delete packages from the server.
    NOTE: This is a shared key (password) for all users.
    -->
    <add key="apiKey" value="<GUID VALUE>" />
If you want to disable authentication all together you can simply set the requireApiKey to false.
Closing notes
This guide should set you in the right path for configuring your own internal PowerShell module repository but this is just the tip of the iceberg.
In the next articles I will explain how to register a repository and push modules to it.
GitHub Link
I have created a GitHub repository where I’ve posted both the package and the full Visual Studio Solution so you can simply download the files and be up and running in no time.
- This is the direct link to the application files that you can simply copy over to IIS
- This is the link to the base repository containing readme, changelog etc.
I will keep this repository up to date when new versions of NuGet are released.
]]>If you look this up in your favorite search engine chances are you came across results like the following (there are more but these are the more common suggestions from users):
# 1
$env:UserName

# 2
[System.Security.Principal.WindowsIdentity]::GetCurrent().Name

# 3
[Environment]::UserName

# 4
$(Get-WMIObject -class Win32_ComputerSystem | select username).username
All the above methods are more or less equivalents and will yield the following results:
- PsCustomObject - Which is my samAccountName
- domain\PsCustomObject - Same as above just with the domain prefix
- PsCustomObject - Identical to number 1
- domain\PsCustomObject - Identical to number 2
Issue is none of them will easily return the UserPrincipalName of the currently logged in user.
This can easily be achieved with the following command:
([ADSI]"LDAP://<SID=$([System.Security.Principal.WindowsIdentity]::GetCurrent().User.Value)>").UserPrincipalName
This command, despite not as user friendly as the other commands, will return the full UPN of the user for example [email protected].
I encourage you to explore the other available methods and properties of the [System.Security.Principal.WindowsIdentity] class as it can be really handy when trying to get details about the current user.
]]>Usually Balena Etcher is my go-to tool for such endeavours but being in a rush and not easy way to download the tool on my Linux box I simply used the good old command line, here is how this is done.
First of all we need to locate the device mapped to our SD card, in my case I’m using a microSD to USB adapter, which can be done with the following command:
sudo fdisk -l

Disk /dev/sda: 931.51 GiB, 1000204886016 bytes, 1953525168 sectors
Disk model: WDC WD1003FZEX-0
Units: sectors of 1 * 512 = 512 bytes
Sector size (logical/physical): 512 bytes / 4096 bytes
I/O size (minimum/optimal): 4096 bytes / 4096 bytes
Disklabel type: dos
Disk identifier: 0x806d3748

Device     Boot      Start        End   Sectors   Size Id Type
/dev/sda1  *          2048    1126399   1124352   549M  7 HPFS/NTFS/exFAT
/dev/sda3       1024002048 1953519615 929517568 443.2G  7 HPFS/NTFS/exFAT


Disk /dev/sdb: 465.76 GiB, 500107862016 bytes, 976773168 sectors
Disk model: Samsung SSD 850
Units: sectors of 1 * 512 = 512 bytes
Sector size (logical/physical): 512 bytes / 512 bytes
I/O size (minimum/optimal): 512 bytes / 512 bytes
Disklabel type: dos
Disk identifier: 0xde0a016a

Device     Boot   Start       End   Sectors   Size Id Type
/dev/sdb1  *       2048   2099199   2097152     1G 83 Linux
/dev/sdb2       2099200 976773119 974673920 464.8G 83 Linux

<snip for brevity>

Device     Boot  Start     End Sectors  Size Id Type
/dev/sdd1  *      2048  526335  524288  256M  c W95 FAT32 (LBA)
/dev/sdd2       526336 6819619 6293284    3G 83 Linux
In my case the SD card is mapped to device /dev/sdd, once we have found the device to use the following command:
xzcat ./ubuntu-21.04-preinstalled-server-arm64+raspi.img.xz | sudo dd bs=4M of=/dev/sdd conv=fsync
0+425226 records in
0+425226 records out
3491662848 bytes (3.5 GB, 3.3 GiB) copied, 99.9634 s, 34.9 MB/s
In the above example I used Ubuntu Server 21.04 as the operating system with the image file being stored in the same path where the command is being run but the same can be used with any other image file.
I hope this can be useful and probably in the future I will post how to easily build a portable Docker/Kubernetes cluster lab.
]]>